Fortkampe
Før en fortkamp
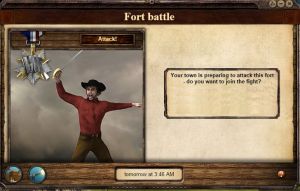
For at starte en fortkamp skal et byrådsmedlem, der tilhører det angribende hold, gå til fortet og opfordre til kamp. I de næste 24 timer har spillere mulighed for at gå til fortet for enten at angribe eller forsvare fortet.
Kun et byrådsmedlem kan opfordre til en fort kamp. Han/hun skal gå til fortet for at gøre dette. Et angreb koster $1.500 på et lille fort, $5.000 på et mellemstørrelses fort og $10.000 på et stort fort. Pengene bliver taget fra den bykassen fra den angribende by.
Deltage i fortkampe
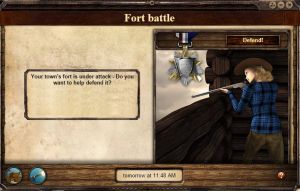
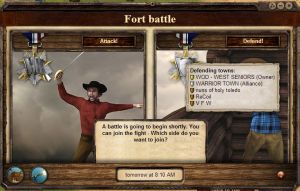
For at deltage i fortkampen skal du tilmelde dig en af siderne, før kampen starter. Spillere fra den angribende by kan kun være med som angriber, spillere fra den forsvarende by kan kun være med som forsvarere. Spillere der ikke er medlem af en by, der er allieret med fortet kan kæmpe på enten den angribende eller forsvarende side.
Før kampen begynder kan du bevæge dig rundt på kortet som normalt. Du skal dog være tilstede, ved fortet, før kampen starter, for at kunne deltage. Du bliver ekskluderet fra kampen, hvis ikke du når derhen til tiden.
Position
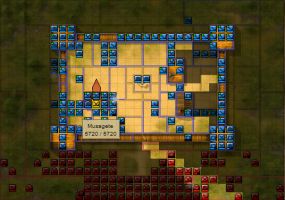
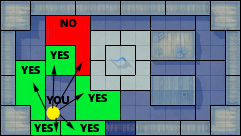
Så snart du er med i fortkampen, kan du vælge din startposition. Som angriber kan du vælge pladser, der er markeret med et rødt felt. Som forsvarer kan du vælge pladser, der er markeret med et blåt felt. Ved at klikke anden gang vælger du dit ønskede mål. Din karakter vil prøve at nå denne plads. Du kan til enhver tid, dog indenfor kampstart, skifte din start position og dit mål ved at trække og slippe i din karakter/mål.
Rangering
Der kan gives rang til spillere i fort kampe. Når en kamp er fuld på den ene side, bliver ekstra spiller tilfældigt fjernet fra kampen. Hver rang får prioritet over dem længere nede på listen, når dette senarie opstår.
![]() General - Grundlæggerne i byen, der ejer fortet, såvel som grundlæggerne og byrådsmedlemmerne i den angribende by er automatisk generaler. Generaler kan skrive i fortchatten og tildele rangering til andre spillere.
General - Grundlæggerne i byen, der ejer fortet, såvel som grundlæggerne og byrådsmedlemmerne i den angribende by er automatisk generaler. Generaler kan skrive i fortchatten og tildele rangering til andre spillere.
![]() Kaptajn - Byrådsmedlemmer i byen, der ejer fortet, såvel som grundlæggere og byrådsmedlemmer i medejerbyerne er automatisk kaptajner. Generaler kan udnævne spillere til kaptajner. Kaptajner kan skrive i fortchatten og tildele rangering til andre spillere, med undtagelse af general og kaptajn.
Kaptajn - Byrådsmedlemmer i byen, der ejer fortet, såvel som grundlæggere og byrådsmedlemmer i medejerbyerne er automatisk kaptajner. Generaler kan udnævne spillere til kaptajner. Kaptajner kan skrive i fortchatten og tildele rangering til andre spillere, med undtagelse af general og kaptajn.
![]() Menig - Menige kan udnævnes af generaler og kaptajner. Menige kan skrive i fortchatten, men kan ikke tildele rang til andre spillere.
Menig - Menige kan udnævnes af generaler og kaptajner. Menige kan skrive i fortchatten, men kan ikke tildele rang til andre spillere.
![]() Rekrut - Rekrut er standard rangen og gives til spillere, når de melder sig til en fortkamp, med mindre kravene for automatisk at blive general eller kaptajn er opfyldt. De kan skrive i fortchatten, men kan ikke tildele rang til andre spillere.
Rekrut - Rekrut er standard rangen og gives til spillere, når de melder sig til en fortkamp, med mindre kravene for automatisk at blive general eller kaptajn er opfyldt. De kan skrive i fortchatten, men kan ikke tildele rang til andre spillere.
![]() Reservist - Reservister kan ikke skrive i fortchatten. De bliver først lukket ind i kampen, når alle spillere med rekrut rang eller over er blevet lukket ind.
Reservist - Reservister kan ikke skrive i fortchatten. De bliver først lukket ind i kampen, når alle spillere med rekrut rang eller over er blevet lukket ind.
![]() Desertør - Desertører kan ikke se fortchatten.
Desertør - Desertører kan ikke se fortchatten.
Kortet
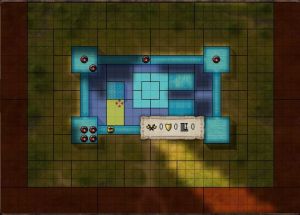
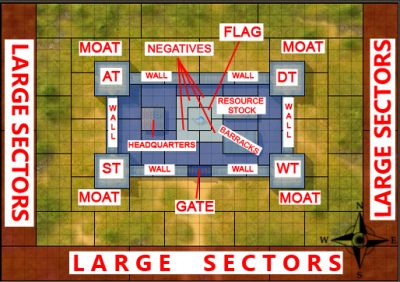
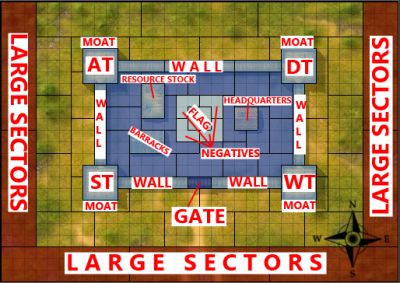
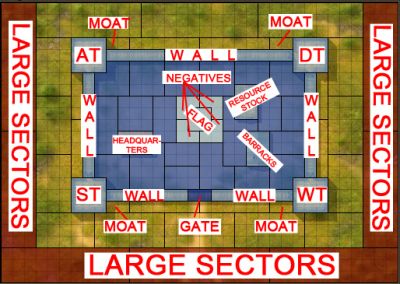
Kampzonen er delt op i forskellige sektorer (de store felter) og felter (små firkanter). Sektorer kan holde kan kun indeholde et hold ad gangen, hvorimod felterne kun kan holde en spiller ad gangen. Visse sektorer giver fordele eller ulemper mod sigte og undvige.
Tårn
Tårnene giver den højeste beskyttelse. De giver bonus til både sigte (angrebsværdi) og undvige (forsvarsværdi), med forøgende effekt ved højere bygningsniveauer. Hver karaktertype har sit eget tårn. Når du står i din karaktertypes tårn modtager du yderligere bonus til sigte og undvige.
| Niveau | Angrebsværdi | Forsvarsværdi | Højde | karakterbonus |
|---|---|---|---|---|
| Ubygget | 8 | 6 | 7 | 6 |
| Niveau 1 | 15 | 11 | 8 | 11 |
| Niveau 2 | 21 | 15 | 9 | 15 |
| Niveau 3 | 25 (24) | 18 | 10 (9) | 18 (15) |
| Niveau 4 | 27 | 20 | 11 | 20 |
| Niveau 5 | 28 | 21 | 12 | 21 |
Mur
Muren tilbyder den næstbedste bonus på kortet. De giver også bonus til sigte (angrebsværdi) og undvige (forsvarsværdi), med førget effekt ved højere bygningsniveau. Hver sektion på muren giver samme bonus, til alle karakterklasser.
| Niveau | Angrebsværdi | Forsvarsværdi | Højde |
|---|---|---|---|
| Ubygget | 3 | 5 | 3 |
| Niveau 1 | 5 | 9 | 4 |
| Niveau 2 | 7 | 12 | 5 |
| Niveau 3 | 8 (7) | 14 (12) | 6 (5) |
| Niveau 4 | 9 (8) | 15 (14) | 7 (6) |
| Niveau 5 | 9 | 15 | 7 |
Port
De to mest sydlige felter af muren er porten. Porten giver samme type bonus som muren, men ved mindre mængder. Begge felter er i højden 0, og forlænger en spillers syn gennem fortet.
| Niveau | Angrebsværdi | Forsvarsværdi |
|---|---|---|
| Ubygget | 0 | 1 |
| Niveau 1 | 1 | 2 |
| Niveau 2 | 2 | 3 |
| Niveau 3 | 3 (2) | 4 (3) |
| Niveau 4 | 4 (3) | 5 (4) |
| Niveau 5 | 4 | 5 |
Bygninger
Kasernen, lageret og hovedkvarteret vises på kortet. De giver en mindre bonus på sigte (angrebsværdi) og undvige (forsvarsværdi), med forøgelse ved højere bygningsniveau.
Flaget
Sektorerne omkring flaget er de eneste områder, der giver en ulempe til angriberen. Felterne omkring flaget giver en ulempe på -10 til både sigte og undvige, mens de omgivende sektorer giver en ulempe på -5. Yderligere vil de forsvarende spillere ikke modtage nogen ulemper.
Koncept
Fortkampe udføres i runder, men ca. et minut mellem hver. Hver runde har alle levende spillere muligheden for at skyde og flytte sig. Dette gøres automatisk af systemet, hvis spilleren ikke er online. Angriberne kan vinde ved at holde flaget i fem runder, eller ved at slå alle de forsvarende spillere ud. Forsvarerne kan vinde ved at slå alle de angribende spillere ud, eller ved at overleve i 55 runder.
Hændelsernes rækkefølge
Spillere skyder, hvis de kan, og flytter sig en gang per runde. Rækkefølgen er som følger:
- Alle de forsvarende har deres tur før de angribende spillere
- Højere rangerede spillere har deres tur før de lavere rangerede spillere
- Alliance medlemmer har deres tur før freelancere.
Når to spillere af samme prioritet, efter de første tre regler, vil spilleren med højeste lederevner få prioritet, herefter undvige, så sigte og til slut spillerID
Bevægelse
Hver runde tillader dig at flytte ind i ethvert frit felt i din nuværende sektor, eller nabo-sektoren, hvis ikke denne tilhører modstanderen. Spillere, der er online, kan markere deres mål ved at trykke på ens spillerikon og herefter vælge sit mål.
Skyde
Når spillere skyder vil de automatisk skyde efter nærmeste synlige fjende. Hvis du derimod vælger en fjendtlig sektor vil du skyde efter nærmeste fjende i den valgte sektor.
Synlighed
De grå områder viser hvilke felter, du ikke kan skyde på. Du kan stadig se spillerne og deres bevægelser i de grå områder. Områder kan kun blokeres af bygninger, som muren og tårnene.
Skudveksling
Der er flere faktorer, der angiver om du rammer eller misser, og hvor meget skade, du vil uddele. Disse faktorer inkludere dine færdigheder og valg af tøj, din modstanders færdigheder og valg af tøj, samt din position og enhver sektorbonus og lidt held.
Sigte
Der vil blive udregnet en angrebs- og en forsvarsbonus for alle spillere, ved hver runde. Jo større angrebsværdien er, des større chance er der, for at ramme modstanderen. Det samme gælder ved forsvarsværdien. Jo højere forsvarsværdi, des større chance for at undvige et skud.
Færdigheder
Tre ud af fem færdigheder bidrager til angrebs- og forsvarsværdierne. Disse er:
- Lederskab, altid brugt
- Gemme sig, brugt af angriber
- Fældeopsætter, brugt af forsvarer
- Sigte, kun brugt til angrebsværdi
- Undvige, kun brugt til forsvarsværdi
Helbredspoint bidrager ikke direkte, men tillader dig at overleve længere.
I version 2.42 vil gemme sig og fældeopsætter erstatte henholdsvis udholdenhed og gemme sig. Dette kan ses i tabellen forneden, hvor færdighedspoint, der giver samme bonus, er vist.
| Bonus | Lederskab / Sigte / Undvige | Gemme sig / Fældeopsætter |
|---|---|---|
| +1 | 1 point | 1 point |
| +2 | 4 point | 3 point |
| +3 | 9 point | 6 point |
| +4 | 16 point | 10 point |
| +5 | 25 point | 15 point |
| +6 | 36 point | 20 point |
| +7 | 49 point | 26 point |
| +8 | 64 point | 32 point |
| +9 | 81 point | 39 point |
| +10 | 100 point | 46 point |
Distance
Når du sigter, vil du modtage en ulempe, der er baseret på antallet af felter mellem jer. Jo tættere din karakter er på den spiller, der skydes mod, des større er chancerne for at ramme spilleren. Distancen har ingen indflydelse på skaden.
- -1 ulempe ved en distance på 1 felt
- -2 ulempe ved en distance på 2 felter
- -4 ulempe ved en distance på 3 felter
- -5 ulempe ved en distance på 4 felter
- -7 ulempe ved en distance på 5 felter
- -9 ulempe ved en distance på 6 felter
- -10 ulempe ved en distance på 7 felter
- -12 ulempe ved en distance på 8 felter
- -14 ulempe ved en distance på 9 felter
- -16 ulempe ved en distance på 10 felter
- -18 ulempe ved en distance på 11 felter
- -19 ulempe ved en distance på 12 felter
- -20 ulempe ved en distance på 13 felter
- -22 ulempe ved en distance på 14 felter
- -24 ulempe ved en distance på 15 felter
Andre bonusser
Angrebs- og forsvarsværdierne kan også forøges ved direkte bonusser. Disse kan komme fra specielle sektorer, såsom tårnene, muren og bygninger, som forklaret tidligere. Yderligere kan visse genstande tilbyde en bonus til den individuelle spiller og/eller en hel sektor.
Skade
Den skade, der vil blive uddelt på dit skud, afhænger kun af hvilket gevær du har på. Et våben giver den skade der er vist, men aldrig mere end 1/3 del af spillerens maksimale helbredspoint. Dette kan forøges ved de nævnte bonusser. En spiller med 1200 helbredspoint, kan derfor ikke blive skadet mere end 400 helbredspoint, fra et enkelt skud. Spilleren kan dog stadig besvime, hvis den bliver ramt af flere spillere.
Færdigheder
Der er kun en færdighed, der har indflydelse på en spillers skade og resistance. Disse er:
- Lederskab, brugt ved skydning
- Gemme sig, brugt ved undvige som angriber
- Fældeopsætter, brugt ved undvige som forsvarer
Helbredspoint
Din endelige skades- og resistanceværdi er delt af antallet af helbredspoint din karakter har, ved fuldt helbred. For eksempel vil en karakter med 2000 skade, fra færdigheder og våben, og 1000 helbredspoint kun modstå 20 skade per skud, mens en karakter med 5000 helbredspoint kun vil modstå 4 skade per skud.
Andre bonusser
Duellantens kritiske skud og Soldatens lederskab (i en grad) giver begge mulighed for at udfører større skade. Hvis en spiller ikke deltager med et fortvåben, vil denne spiller bruge en sten, der skader 50-110.
Efter kampen
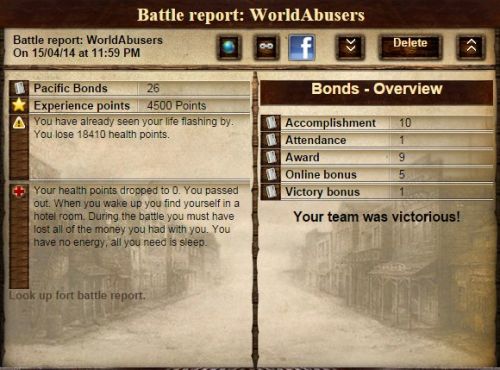
Efter kampen vil alles helbredspoint blive opdateret, og spillere, der blev slået ud, vil blive sendt på hotel. En kamprapport vil blive udformet og sendt til alle de deltagende spillere. Hvis angriberne vandt kampen vil fortet blive overdrevet til den angribende by. Fortet vil herefter være fredet i 24 timer.
Individuelle Belønninger
Alle, der deltog i kampen, vil modtage Bonds og erfaringspoint. Antallet af erfaringspoint afhænger af spillerens niveau, tildelt skade, overlevelsestiden og kampens udfald (vind eller tab). Du modtager også point, selvom du besvimede. Penge, der blev tabt i kampen, vil blive uddelt til det vindende hold.
Bonds
Hver kamprapport viser hvor mange bonds, der blev tildelt og hvorfor. De følgende faktorer bidrager til antallet:
- 1 bond for deltagelse
- 1 bond ved sejr
- Op til 9 bonds ved at have den højeste værdi i statistikken
- Op til 10 bonds ved at modtage visse præstationer
- 0.1 bonds per ramt skud
- 0.1 bonds per undviget skud
- 0.0005 bonds per tildelt skadespoint
- 1 bond per spiller, der blev slået ud
- 0.1 bonds per runde, spilleren var online i (maks 6 bonds)
Selvom du er kvalificeret til flere, så vil du maksimalt modtage 26 bonds.
Denne del til oversættelse senere - beklager rodet
So here you are, you decided to join the amazing world of fort fighting. This guide will explain the basics that will help you go through your first fort battling steps.
Terminology
Fort fight: Fort battles are a player-versus-player turn based game where two teams of players fight to take over or defend a fort. Fort fight is a team based experience that takes place in chats and lasts for about 1,5 hour.
Crit: A critical hit is a class advantage that only duelers have that deducts an additional 10% off an enemy fighter's maximum health points. Dueler class players have a 10% chance (20% if premium) each round to score a critical hit on an opposing player.
Bail: The action of moving away from the line of fire, usually by dismounting a wall or tower.
Blind Spot: The spot in a sector or tower where you are exposed to as few opponents or as little damage as possible. It is used for blocking purposes.
Ghost: Ghosting is a class advantage only adventurers have and makes them powerful blockers. Starting with the 2nd time they get hit in one round, they get a 25% chance (or 50% for premium) of not being hit at all. It’s not dodging. It’s more than that, it’s like they don’t exist.
Green: When you set your move in a fort fight, your arrow is red. When two fighters agree to swap positions and have set their swap correctly, the arrow between them turns green.
LOS: Acronym of Line Of Sight. This is perhaps the most important thing in a fort fight. It shows you the areas on the map that your character can shoot at and get shot from. You can see your current LOS by hovering the mouse over your character's icon on the fort fighting map. All bright areas are your LOS. The greyed out areas are those that you cannot shoot at and you cannot be shot from. If you move, your LOS will change.
Moat: Sectors outside the fort, next to the towers. Blocking them usually prevents the enemy from moving faster and prepares the attacker to mount a tower or a wall.
Mount: Usually followed by the name of a tower, building or wall. When you are ordered to mount something, aim to move on it (only if you’re next to it).
Negatives: These are the areas that surround and contain the flag. These are the L shaped sectors around the flag plus the square of the flag. They are called like that because they are the only sectors on the fort map that give negative bonus to the person standing on them. The flag area gives -20 on your attack and on your defence value. The L sectors surrounding it give -10 on the attack and on your defence value.
Swap: When either another player or the battle leader ask you to swap positions. Green arrow confirms the swap, red arrow means one of the two players hasn’t set his character to swap.
Point: The spot in a sector or tower where you are exposed to as many opponents possible. Usually taken by players with the highest hp at that current round. A person taking point is protecting those behind him from getting shot, but allows them to shoot at the enemy.
Before you join
In order to take part in a fort fight, two things should always occur.
- You must have signed up for the fort fight.
- Your character must be located at the fort when the battle starts.
Signing Up
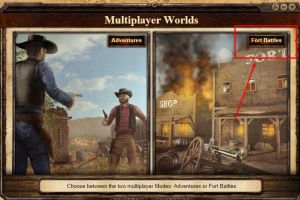
Step one: Click on the Multiplayer Games button
Step two: Click on the Fort Battles button
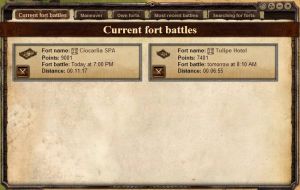
Step three: Click on the fort battle you want to join
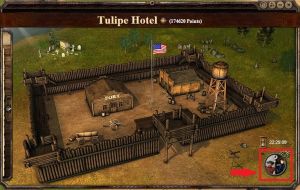
Step four: Click on the "To arms!" button
Step four: Sign up to the battle. If you hover over the "attack" or the "defend" image you will see which other towns have joined the attack or the defence respectively.
This is the screen if your town isn't part of the attackers' nor the defenders' alliance or if you're townless.
What will I need?
Clothes
You should wear clothes that boost your fort fighting skills. These skills are Stamina, Health Points (from now on we will just call it HP), Dodging, Hiding, Aim and Leadership. Depending on the current fort fighting formula some skills might be more important than the others. For example, in the version we're now playing, Aim and Dodging are not that important. Health is the King, Leadership gives you damage (it also help with aiming and dodging), Stamina and Hiding gives you resistance and help you aim and dodge better. The current fort fighting formula can be found here.
Hint: As a beginner, the wisest thing to do is to wear clothing that increases your HP because you will probably make movement mistakes. Since you don’t want those mistakes to get you killed in just one round, having as much HP as you can get might save you. Furthermore, in many worlds giving out ranks is done on a descending HP base; this means that those with the highest HP get priority in getting ranked while lower ones either have to wait or they don’t make it in the fort fight at all. So the more HP you have, the higher your chances are to get a rank.
Left Hand Gun
You will also need a left hand gun. A fort fighting gun. Here is a list of the best guns per level and per class.
| Stone | 50-100 (80) | 1 | 1 | 1 |
| Brittle Bow | 50 - 130 (90) | 5 | 2 | 1 |
| Bow | 70-150 (110) | 10 | 7 | 4 |
| Precise Bow | 100-188 (144) | 13 | 10 | 7 |
| Precise Crossbow | 120-192 (156) | 23 | 20 | 17 |
| Precise Harquebus | 112-232 (172) | 33 | 30 | 27 |
| Precise Musket | 126-266 (196) | 43 | 40 | 37 |
| Precise Coach Gun | 168-268 (218) | 53 | 50 | 47 |
| Precise Percussion Rifle | 172-292 (232) | 63 | 60 | 57 |
| Precise Breech - Loader | 200-296 (248) | 73 | 70 | 67 |
| Precise Winchester | 200-312 (256) | 78 | 75 | 72 |
| Modified Precise Musket | 206-346 (276) | 95 | 92 | 89 |
| Modified Precise Breech Loader | 231-288 (259,50) | 103 | 100 | 97 |
| Modified Precise Percussion Rifle | 265-290 (277,50) | 120 | 117 | 114 |
| Precise Single Shot Rifle | 200-400 (300) | 139 | 136 | 133 |
| Precise Trade Musket | 225-325 (275) | 144 | 141 | 138 |
| Modified Precise Winchester | 280-280 (280) | 147 | 144 | 141 |
Sidenote: There are named guns that are superior to those in the list above. They are not mentioned though on purpose. Many named guns are better for specific builds than others; as soon as you get into the fort fighting mechanics, you will find your way and pick the named gun that suits you the most. Furthermore, guns with a wide range, e.g. 1-400 are not included because they are not as precise as other guns even if their average shot is higher.
Furthermore, there is a new feature in the game called "Item Upgrading" that affects weapons and clothes. Some of them are good for fort fights too, so you might want to read about it here.
Buff
As we said, your fort fighting abilities are affected by 6 skills in total (Stamina, HP, Hiding, Dodging, Aiming and Leadership), therefore you can understand that there is a numerous amount of buffs that can boost those skills. What I am going to list for you here is just a personal choice of what the "best" fort fighting buffs are. Feel free to find your own ideal combination and let me know if you have any other suggestions.
When it comes to using buffs, it's always nice to have in mind a lovely thread Slygoxx made a long time ago. It is not 100% up to date, but it is a great guide for using buffs in general. You can find the thread here.
So, keeping in mind we will be using 1 Character Buff together with 1 Item Buff:
| Fort Fighting Buffs | |||||
|---|---|---|---|---|---|
| Image | Buff Name | Type of Buff | Fort Battle Related Effect | Uses | |
| Amulet | Character Buff | +10 Dodge, +10 Health Points | 1 | ||
| Bayonet | Item buff | +25-75 Fort Battle Damage | 1 | ||
| Disappearing Ink | Character Buff | +2 Strength, +15 hiding, +15 setting traps, +15% HP Bonus | 5 | ||
| Hip Flask | Item Buff | +40-40 Fort Battle Damage | 2 | ||
| Hushpuppy | Character Buff | +2 Mobility, +15 Leadership | 5 | ||
| Modern Armor | Item Buff | +4 Fort Battle Defence, +10% Health Bonus | 2 | ||
| Vegetable Dumpling | Character Buff | +2 Dexterity, +15 leadership | 5 | ||
| Westerner | Item Buff | +20-60 fort battle damage, +4 Fort battle attack | 5 | ||
| Ammunition Slide | Item buff | +40-60 fort battle damage, +4 Fort battle attack, +4 Fort battle defence | 5 | ||
You can test and find out yourself your favourite combinations according to your attacking or defensive build.
After you join - Before the fort fight
One of the first things to do is to check the battle chat topic; usually this will guide you on where to start and/or where to set your character. If there is no topic, ask someone else in the chat for help/advice on where to set.
How to set your character and your target
Click once on the desired spot you want to start on the map. You will see a yellow mark that indicates your character. This is where you will be placed once the battle starts (unless someone else starts at the same spot with you, but ignore this part for now).
Click on the desired target spot. A red cross will appear. This is where your character will aim to move to unless you change your target when the battle starts.
Attention: If you are an attacker and you fail to set a target for your character, the game with automatically set your target to the flag.
There's only a limited amount of players that can take part in a fort fight so you want to make sure you’ll get in.<spoiler text="Click here for details">{| border="1" style="margin: auto"
|
|
|
|- |Small |50 |42 |- |Medium |100 |84 |- |Large |140 |120 |}</spoiler>Having a rank can insure you join the battle. Ranks are given out by a General or a Captain who has this responsibility before the battle begins (usually it starts maximum 1 hour before the fight).
General rules of ranking:
- Wait to ask for a rank until the ranking procedure starts
- Always ask only once for a rank. There is no need to spam the whole chat over and over again just to get a rank. Usually this ends up in having the exact opposite result.
- No caps please unless you are the person ranking. No need to shout at the rest.
- Using the word “please” shows manners too and makes the ranker’s job more pleasant. Don’t forget after all, he’s the one usually stressing about getting you guys and gals in the battle.
- No spamming - Your chit chat is making it difficult for the ranker to see who has asked for a rank.
- No offensive language.
- No begging.
- If you are going afk/offline during the fort fight, notify the ranker in advance.
Question: Why are there different ranks?
A rank determines the order in which people shoot and move. In attack, all the town’s councilors and founders are given a general’s rank (4 stars) automatically, however, in defence, only town founders get a general’s rank whilst councilors get an automatic captain’s rank (2 bars). More about the order of the events can be found here.
Let the battle begin!
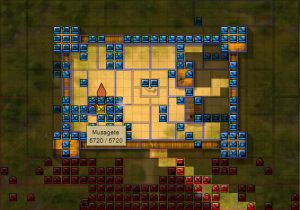
The Map
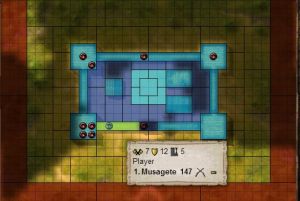
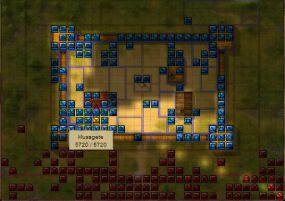
Congratulations! You’re taking part in the battle! Before we start explaining how to move, let’s have a look at the map.
Explanation:
AT stands for Adventurers Tower
DT stands for Duellers Tower
ST stands for Soldiers Tower
WT stands for Workers Tower
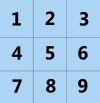
You will also hear people saying "AT1" or "DT2" and so on. This is to indicate a specific spot on a tower. The numbers go as follows and they are the same for all four towers:
Movement
Now let’s go to what we are here for. The battle just started, we know where everything is located on the map and now it's time to fight!
First thing to do: Right click with your mouse on the fort fighting screen, select Quality and set it to low. Doing this will make LOS more clear to see.
The Classes
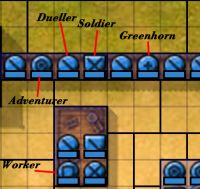
Taking a closer look at the characters on the map, you will distinguish the five classes that are available in the game.
You may also notice that some players are represented as a square character or a semi circular shape
This indicates the difference between specific fighters too. Fighters with a square character are either members of the digging alliance (attackers side) or part of the alliance that owns the fort (defenders side). The rest of the fighters are represented with a semi circular shape.
The Classes bonuses summary
- Adventurer
Special skills: Ghosting. This means that after 2-4 shots, there is a high chance that you guys pretty much "disappear" from the fort map. You are still on the map, we can all see you, but you cannot be shot. You're invincible. You're the ultimate blockers.
Writer's comment: We love you, we truly do. You guys have the ability to ghost. Okay, landing a hit is like winning the lottery and this can be frustrating, we know. But think of this. Forts are won or lost because of you. If you block long enough, we keep it. If you are attacking and capture a sector the attackers need, you give them a huge bonus. We love you.
- Dueller
Special skills: Crits. This means that you can cause very high damage to the opponent. You have the chance of dealing a damage that's equal to 10% the opponent's Maximum HP + your gun damage (plus the extra damage you get from your leadership). Yes, this is why you see some crazy hits like 1500 or even 3000. Those are crits by duellers.
Writer's comment: Yes we love your damage. Yes we love your crits. And yes we do adore the fact that you can ko the right blocker at the right time and let us get to the flag/wall/tower. You are our damage dealers.
- Soldier
Special skills: Sharing Leadership and High Health. For all the other classes, 1 skill point that's spend on Health skill points, it gives them 10 health. For you guys, it gives you 15 health (if you are premium, this goes up to 20 health). Furthermore, you increase the leadership of you and 4 of your neighbouring players by 25% (50% if you're premium). Do not focus too much on this now though until you're an experienced player.
Writer's comment: You're the meatshields, our front line, taking the bullet for the rest. You always move to protect the rest of your team mates. Capable both of blocking and shooting, you're a very good all around class.
- Worker
Special skills: Increased sector bonus. You get 30% more (or 60% if you are premium) bonus from the sector. So if someone in your sector has a gun that gives +3 attack to all, you get that and on top of it 30% more. Same goes for damage and the rest of the bonuses. This bonus includes buildings, walls and tower bonuses.
Writer's comment: You are a good blocker that can deal some damage. You're pretty much like an enhanced soldier when it comes to being a meatshield. On your tower you're just beasts.
- Greenhorn. Special skills: None
Writer's comment:You are those romantic guys that decided not to pick a class before you reach 150 or you're just too indecisive to do so. You have no fort fighting skills. You're just mediocre meatshields. The rest of the team is waiting for you to finally make up your mind and pick one of the 4 above mentioned classes. Do it already!
Orders
Every proper fort fight has a leader. You will identify that person in many ways. Usually it's a person writing in capital and bold letters. Most of the time they use a coloured text too. He or she is an experienced player that has done this before. Always follow the leader’s orders. Fort fighting is a team game, so it is crucial that we are all moving as one.
| The general idea is we move as a team, sharing the fire we take while trying to hurt the opponents. This is why having a good LOS is important and working as a team is even more important. |
Hint: During the battle you might get some orders that you don’t understand. Don’t be ashamed to ask in the chat for clarifications. From my experience, there is always someone that wants to help new players and will end up talking to you in a whisper, helping you throughout the battle.
In order to move, click on your character and then click on an open spot at the end of your arrow in a neighbouring sector or in your current sector. At the beginning of the next round, your character will move to that spot or the closest one available. If the sector you are aiming at is full, you won’t move until a spot empties. Always remember that other fort fighters will probably aim at the same spot as you. Who will get that spot is determined by the movement hierarchy as described here. Therefore, if you are low in the movement hierarchy, try aiming at spots that are a bit less "popular" so as to be able to move as you wish.
Caution: You cannot move diagonally.
Movement hint:
Aim one sector at the time. The game’s Artificial Intelligence (AI) isn’t that smart (yet) and doesn’t take into consideration the existence of enemies in the fort battle. The way it is designed, it is trying to get you to the spot you aimed at as fast as possible. Therefore, aiming 2 sectors away might get you in a pretty bad position with tons of enemies shooting at you and most probably ending up getting you killed. Always aim one sector at the time unless the leader orders you differently.
Aiming/Shooting
Aim and targeting is automatic. You cannot choose who you want to shoot, you cannot aim past the people in front. You may only shoot at the closest target in your line of sight. What you can do though is aim at a specific sector (that is adjacent to yours); this will make you shoot at the people in that sector.
- One shot can’t take more than 1/3 of the maximum HP of a player. By maximum HP we mean maximum amount of health a player has when the battle starts. For example if the battle starts and you have 5400/7000 hp, your maximum HP is 7000.
To make it simple, always keep the following in mind:
1. The defenders shoot.
2. The defenders move.
3. The attackers shoot.
4. The attackers move.
So when you are attacking, always remember you will be shot at the beginning of the next round. So try not to be too much exposed at the enemy if you're low on health.
| Fort fighting is something that you are improving at as you gain more experience (like most things in life to be honest). Therefore, don’t be disappointed after a bad fort fight. Also don't be disappointed if you miss a lot or you don't dodge well. Always keep in mind that the attack and the defence chances are based on probabilities and sometimes we don't get lucky. Be persistent and you will get there. After all, we were all noobs before we started (some of us still are and will always be). |
After the fort fight
After the fort fight is over, you will get a report with the results.
If you passed out during the fight, you will be send back to your town's hotel and the game will automatically set 8 hours of sleep for you. If you don't have a town you will remain at the fort's location. If you die during a fort fight you don't lose your inventory or your banked cash; but you do lose the cash you're carrying on you and your energy drops to 0. If you survive, you will remain at the same location. Your health will match the health you had when the last round of the fort fight ended.
FAQ
Q1: What the heck! How did I end up on the wall? I didn't aim there!
When you end up in a sector you haven't aimed at, this means that you probably set your character to move 2 sectors away, letting the game's AI decide the best route for you. The best route for the game is the shortest way but surely not the safest one.
Q2: Why am I not taking part in the fort fight? I have a rank!
Blame the ranker! Apparently the person giving out ranks ranked more players than he should (also known as overranking). Therefore people with a higher rank than you (Generals > Captains > Privates) or higher leadership got in first and you didn't. You can find more details on the priority of the events here.
Q3: Why am I starting at this spot? I didn't place my character there!
Ok there are two explanations for this one. Either someone with higher hierarchy sat on you (stacked you) and you were pushed to the closest available spot or you forgot to place your character on the map before the fort fight.
Q4: Do I have to be awake to take part in the fort fight as a defender or can I sleep at the barracks?
You can set to sleep in the barracks. If you make it in the fort fight, the sleep will be cancelled though and after the fort fight you will be just sitting there. If you don't make it in though, you'll continue sleeping unless the fort is lost.
Got any further questions? Please contact me (Musagete) and I can help you and add them to this manual.


